Connecting to a ZeroTier network
ZeroTier allows individual devices and network routers to access your LAN via a distributed interconnection overlay that automatically chooses the optimal route between nodes. The protocol's design ensures easy deployment, centralized management, stable performance, and data protection. As a result, connections are secure, providing low latency and high throughput.
To configure your Keenetic device to connect to your ZeroTier network using the command-line interface (CLI), we must first create an interface with the following CLI command.
interface ZeroTier{X} Where {X} is the index of the new interface, the number you choose.
Note
The interface command changes the context of your CLI to the indicated interface context. The subsequent commands are executed for the indicated interface until you enter the exit or other context-changing command.
Then, let's specify the NETWORK ID of your ZeroTier network.
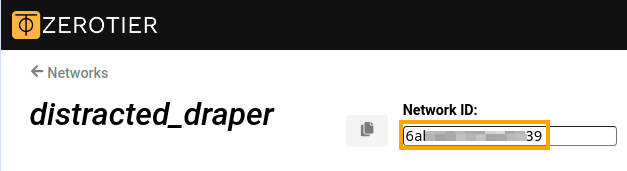
zerotier network-id {network_ID} Replace {network_ID} with your ZeroTier NETWORK ID without quotes or brackets. You can find your network's NETWORK ID on the ZeroTier Central management portal, as shown in the image.
Next is to enable the acceptance of addresses and routes distributed over your ZeroTier network.
zerotier accept-addresseszerotier accept-routes
Then, bring the interface up and save the configuration.
upsystem configuration save
The whole set of commands listed above should look like the following.
(config)>interface ZeroTier0Network::Interface::Repository: "ZeroTier0" interface created. (config-if)>zerotier network-id 0123456789abcdefZeroTier::Interface: "ZeroTier0": set network ID to "0123456789abcdef". (config-if)>zerotier accept-addressesZeroTier::Interface: "ZeroTier0": enabled addresses accept. (config-if)>zerotier accept-routesZeroTier::Interface: "ZeroTier0": enabled routes accept. (config-if)>upNetwork::Interface::Base: "ZeroTier0": interface is up. (config-if)>system configuration saveCore::System::StartupConfig: Saving (cli).
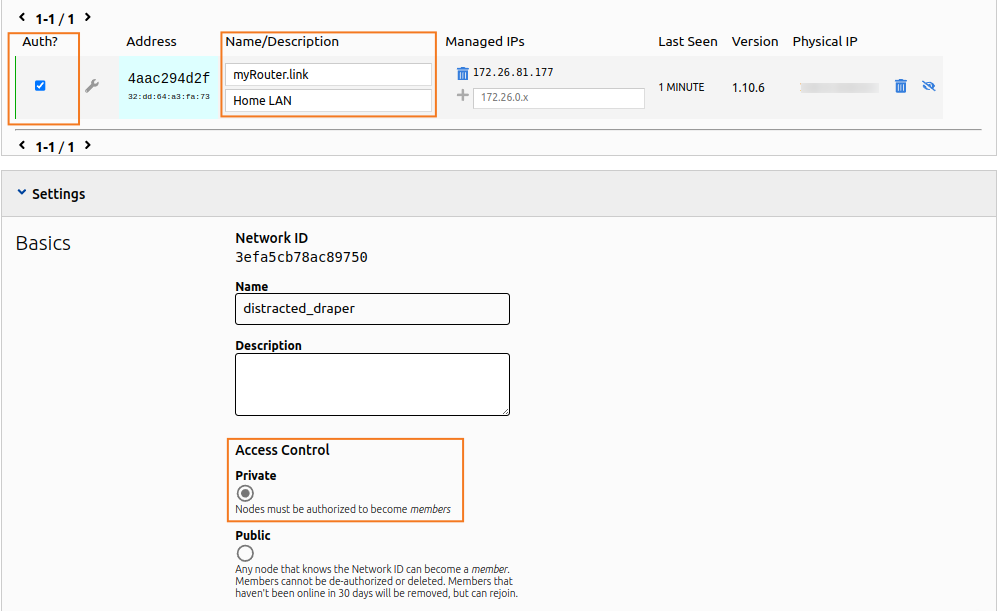
After entering the commands, your Keenetic node should appear on your ZeroTier Central network dashboard. To simplify network management, enter a name and description for the new node. You may also need to authorize the new member if your network's Access Control mode is Private (the default setting).
You may use the show command to review the connection state on your Keenetic device. The connected: yes line indicates that the connection status is positive.
(config)> show interface ZeroTier0
id: ZeroTier0
index: 0
interface-name: ZeroTier0
type: ZeroTier
description:
traits: Mac
traits: Ethernet
traits: Ip
traits: Ip6
traits: Supplicant
traits: EthernetIp
traits: ZeroTier
link: up
connected: yes <------
state: up
mtu: 2800
tx-queue-length: 1000
address: 172.26.81.177 <------
mask: 255.255.0.0
uptime: 312
global: no
security-level: public <------
ipv6:
addresses:
address: fe80::cc56:2aff:fed4:d8a3
prefix-length: 64
proto: KERNEL
valid-lifetime: infinite
mac: 32:dd:64:a3:fa:73
auth-type: none
zerotier:
via: GigabitEthernet1
local-id: 4aac294d2f
network-id: 0123456789abcdef
network-name:
status: OK
summary:
layer:
conf: running
link: running
ipv4: running
ipv6: disabled
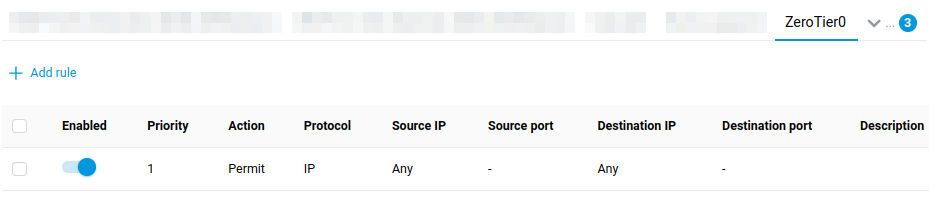
ctrl: runningNote that the created interface has a security-level: public setting. This means that incoming connections must be explicitly allowed by the Firewall. Considering your ZeroTier network is trusted, one rule allowing all incoming traffic is enough. Add a new Permit rule for the created ZeroTier interface, and select IP for Protocol and Any for Source IP and Destination IP, as shown.
Tip
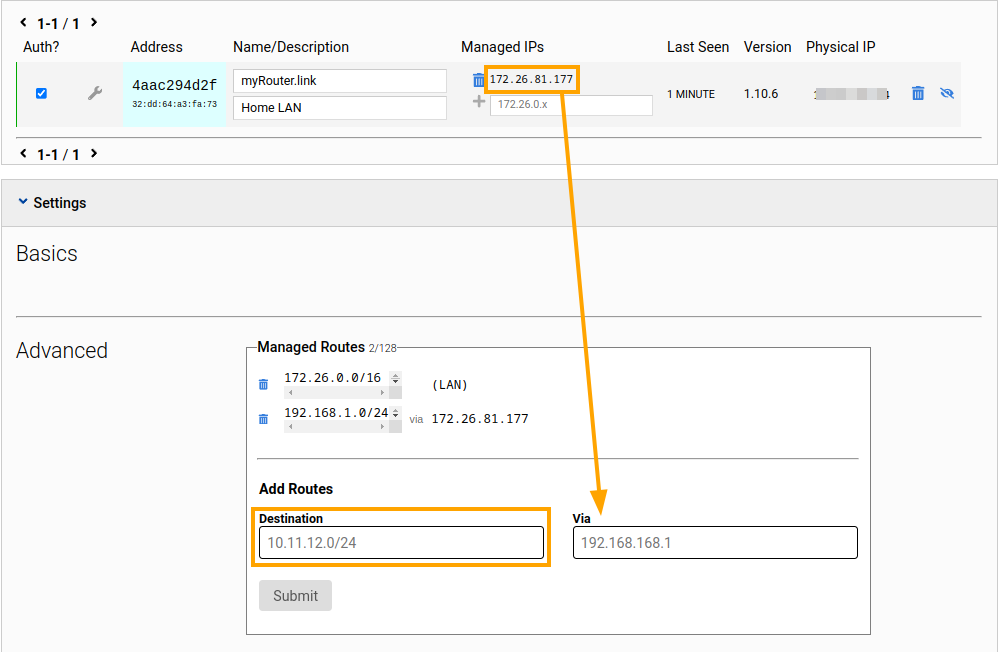
To inform other devices on your ZeroTier network about the LAN behind your new node, create a route in the Advanced section of your network's settings on ZeroTier Central. Use the Managed IPs address (the address: 172.26.81.177 line in the output above) as the Via address. Enter your router's LAN subnet address (192.168.1.0/24 by default) in the Destination field.