Installation of the Asterisk IP PBX OPKG package
This article serves as a guide to setting up the Asterisk communication platform from Digium on a Keenetic router. Asterisk allows you to expand your router's capabilities with IP-based PBX (IP-PBX) features. Such a PBX can support dozens of internal extensions, providing call routing across multiple external lines, call recording, interactive voice menus, conference calls, and other features. It can be used to set up a telephone network in a small office. Connecting a Keenetic Phone Station with Keenetic Plus DECT and Keenetic Linear telephony modules installed on the same device to Asterisk is performed automatically during the installation process.
To make installing and configuring Asterisk as easy as possible, use the installer available via the link at the end of this article. It allows you to automatically install Asterisk and set up the following features:
Internal numbers 1000–1009, 2000–2009 for connecting IP phones, smartphones, softphones, VoIP gateways, etc. (hereinafter 'IP phones') to Asterisk via the SIP protocol. IP phone users will be able to make and receive calls via external lines, call each other using internal numbers through Asterisk, and set up conference calls. DECT handsets and phones from the Keenetic Phone Station installed on the same router connect to Asterisk automatically during setup;
External lines for connecting to IP telephony providers (hereinafter 'SIP trunks') can be configured automatically by copying the Keenetic Phone Station line configuration;
Calls via a mobile operator’s LTE network from phones or DECT handsets connected to the router using Keenetic Plus DECT and Keenetic Linear telephone adapters (hereinafter 'VoLTE' or 'VoLTE calls'). A 4G USB modem is used to connect to the LTE network. VoLTE configuration is performed automatically if a USB modem with VoLTE capabilities is detected during the Asterisk installation process;
Call Transfer feature. Transfer a call to another internal number. Works on any IP phone connected to Asterisk;
Voice menu for incoming calls. A caller dialing in from an external line hears a prompt to enter an extension number. The caller enters the extension number, and Asterisk connects them to the appropriate user;
Conferences for three or more participants. Every user connected to the conference can speak with all other users in the conference;
Voicemail. Callers who reach you when you are unavailable can leave a voicemail. An external USB drive is required to store messages. To set up voicemail, you need to run a special script after installing Asterisk; see further in this article;
Call recording. All calls can be recorded. An external USB drive is required to store call recordings. To configure call recording, you need to run a special script after installing Asterisk; see the later section of this article.
This installer is designed to set up Asterisk on a router’s internal storage with a capacity of at least 55 MB. All necessary Asterisk software components are downloaded from the repository during the installation process.
To install Asterisk, you will need the following:
1. A Keenetic router with built-in storage. Compatible models are listed below.
MIPSel architecture: Hero (KN-1011), Titan (KN-1810), Skipper (KN-1910/1912), Hero 4G (KN-2310/KN-2311), Skipper 4G (KN-2910), Hopper (KN-3810)
MIPS architecture: Hero DSL (KN-2410), Skipper DSL (KN-2112), Hopper DSL (KN-3610)
AArch64 architecture: Peak (KN-2710), Titan (KN-1811/KN-1812), Hero (KN-1012), Hopper (KN-3811), Hopper SE (KN-3812), Hopper 4G+ (KN-2312), Hero 5G (KN-4110)
2. An Internet connection to download software components from the repository.
In addition to the above, the following is required for VoLTE calls:
3. A Quectel 4G modem with USB Audio support, compatible with the asterisk-chan-quectel channel driver. Detailed information about the driver can be found here.
Tip
This build has only been tested with the Quectel EC25-E modem.
4. A SIM card for making phone calls on the mobile operator’s LTE network.
5. A Mini PCI-E to USB adapter with a SIM card slot. This adapter is required to connect a 4G modem with a Mini PCI-E interface to the router’s USB port.
6. External antennas for the modem. External antennas must be connected to the modem if the modem does not have built-in antennas.
7. Keenetic Plus DECT or Keenetic Linear telephone adapter with DECT handsets or telephones connected, respectively.
KeeneticOS version 4.0.4 or later must be installed on the router with the following components:
1. SSH server;
2. Open Package support;
a. Kernel modules for filesystems support;
b. Kernel modules for USB Audio support (for VoLTE);
3. QMI interface for 5G/4G/3G USB modems (for VoLTE);
4. Keenetic Phone Station (for VoLTE and automatic SIP trunk configuration).
Preparing to install Asterisk
If you need to configure VoLTE calls, please follow these steps before installing Asterisk:
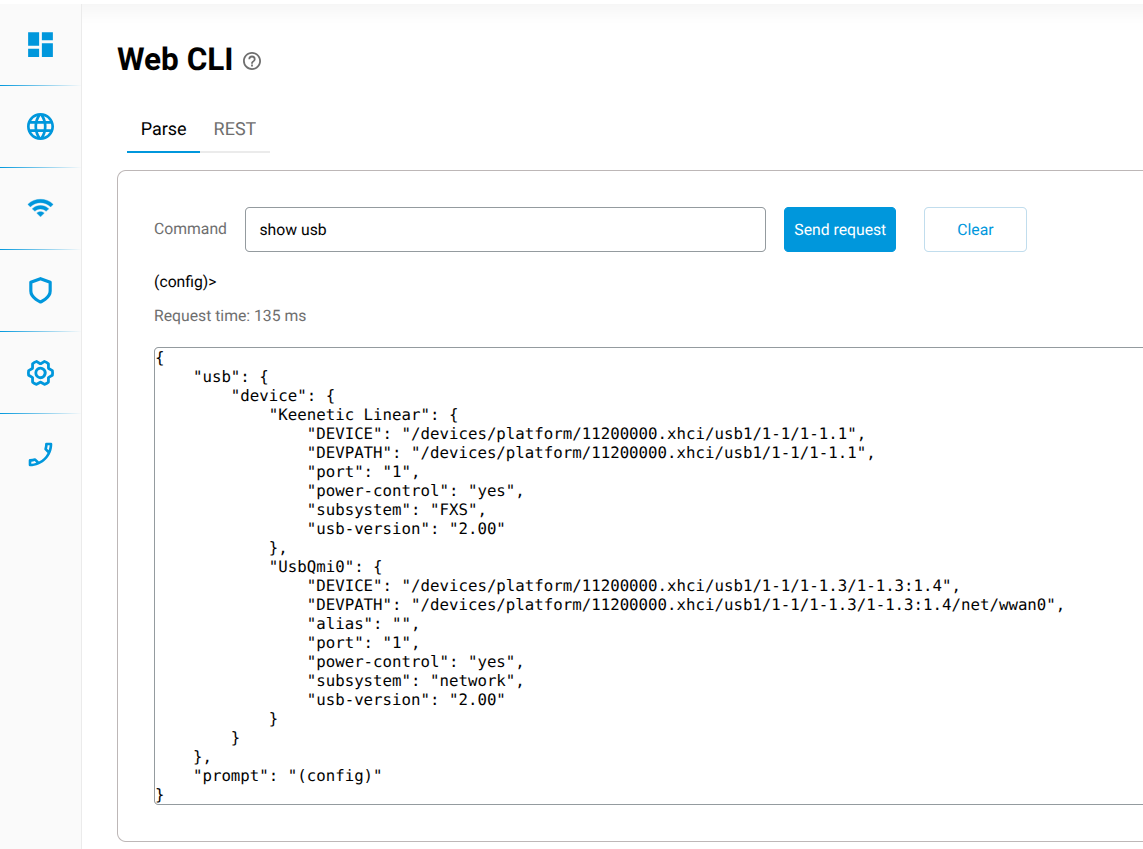
1. Connect the USB modem and the telephone adapter to the router. Run the command show usb and ensure that both devices appear in the system, as shown in the screenshot below;
Tip
The USB modem should be connected to a USB 3.0 port, and the telephone adapter to a USB 2.0 port.
2. If you are using the Keenetic Plus DECT telephone adapter, register at least one DECT handset;
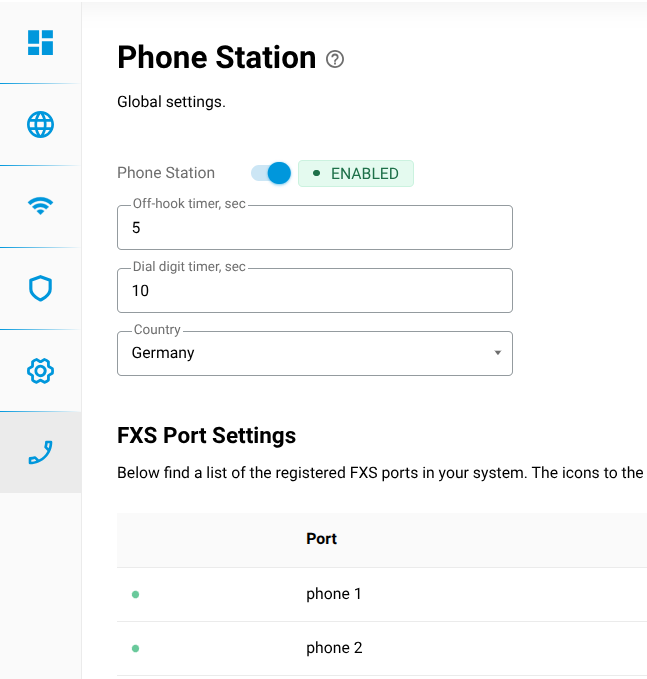
3. Ensure that the Phone Station is switched on and that the DECT handsets or telephones are displayed in the system (see the Phone Station page in the web interface);
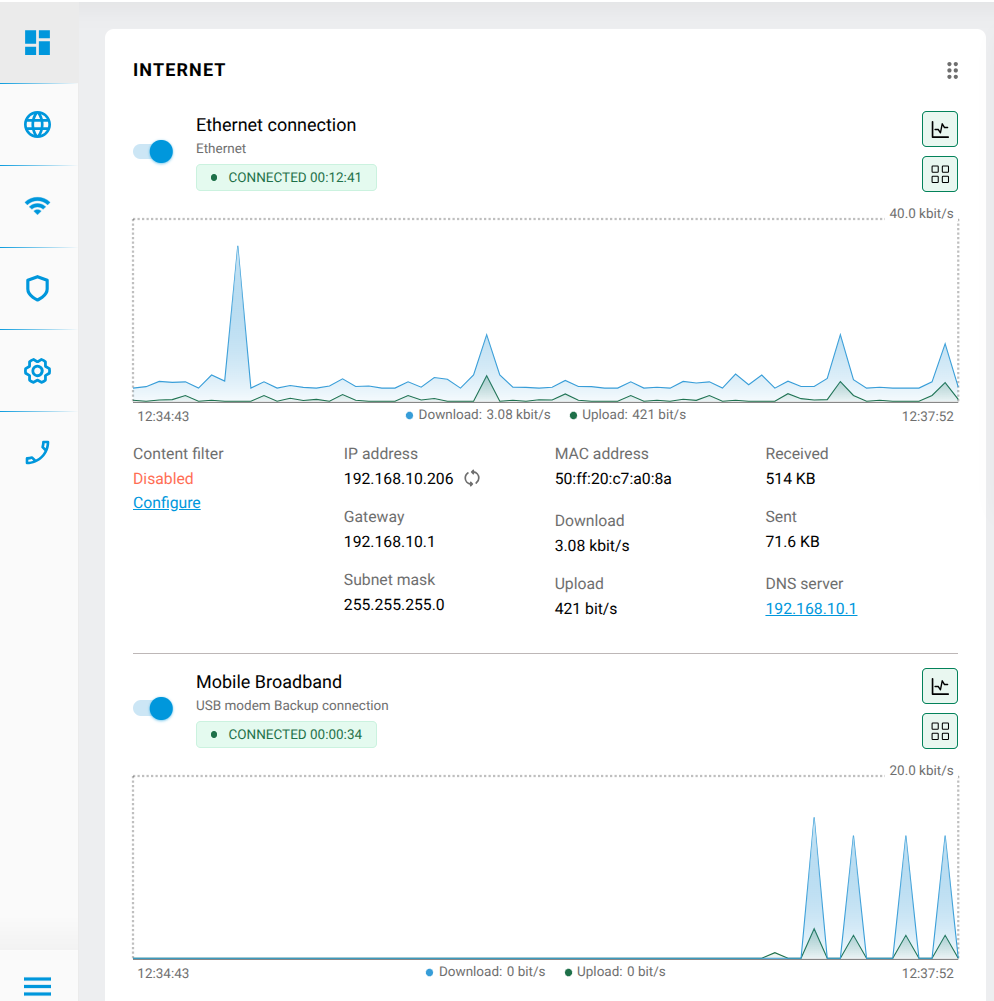
4. Make sure your router is connected to the Internet.
Tip
Any Internet connection will work for the installation, including a mobile connection via a 4G USB modem.
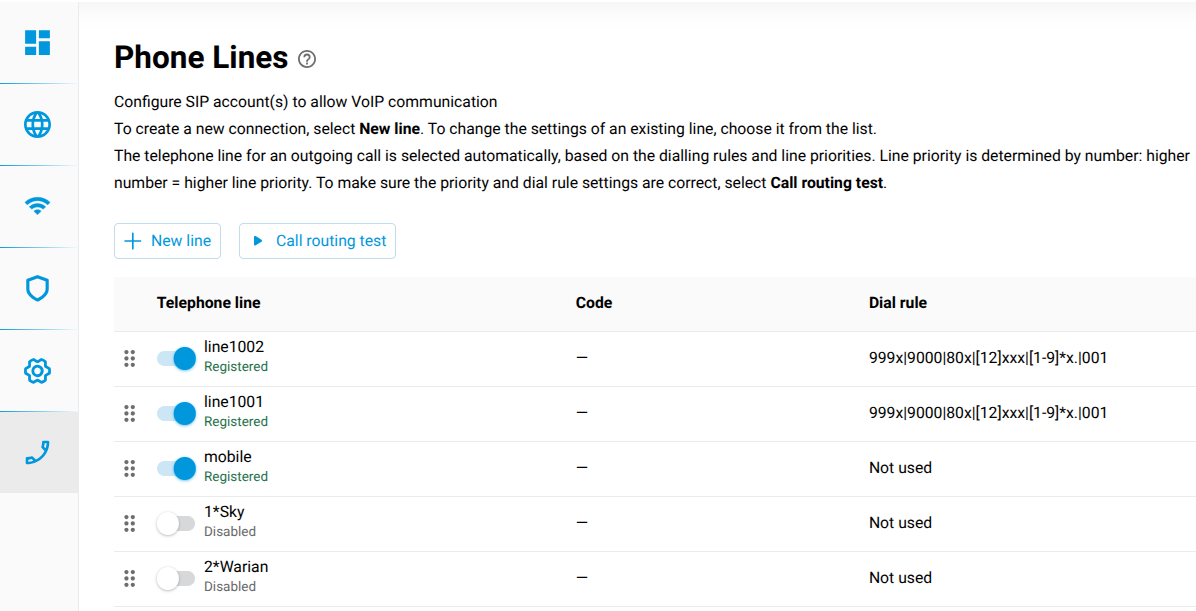
If you need to automatically configure SIP trunks to connect Asterisk to IP telephony providers, you must first create special telephone lines in the Keenetic Phone Station to connect to these providers and ensure that SIP registration is successful and calls are working. The name of each of these lines must contain a prefix, as shown in the screenshot below.
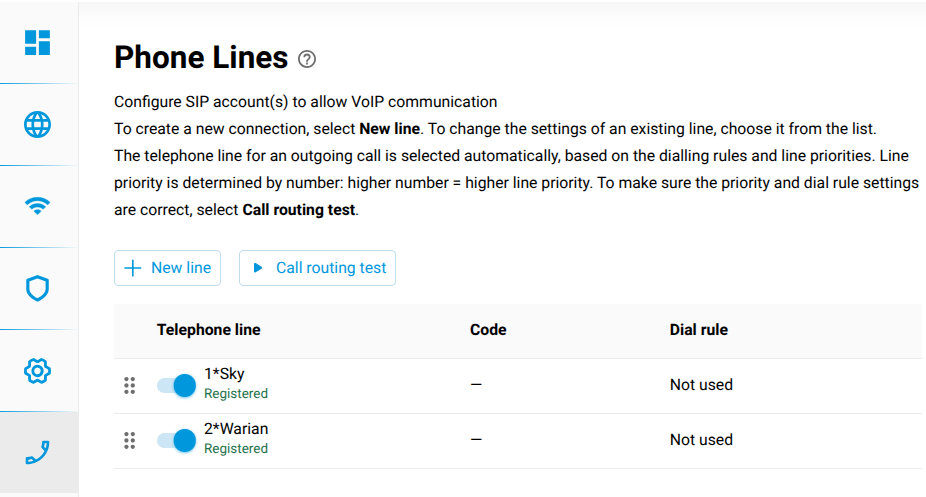
A prefix consists of a digit from 0 to 9 and the * symbol. During Asterisk installation, the configuration of each line with this name is used to set up a SIP trunk, and the prefix is used when creating call routing rules via this SIP trunk.
Installing Asterisk
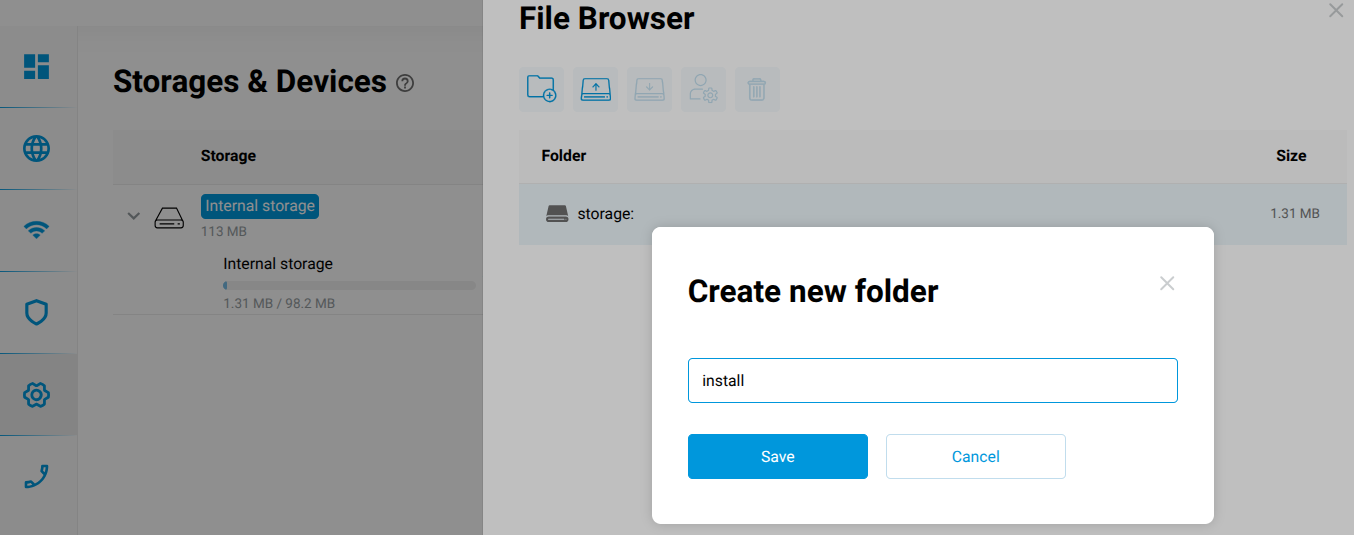
1. On the web interface page Management > Applications, in the Storages and Devices section, select Internal storage and create a new folder within it named install;
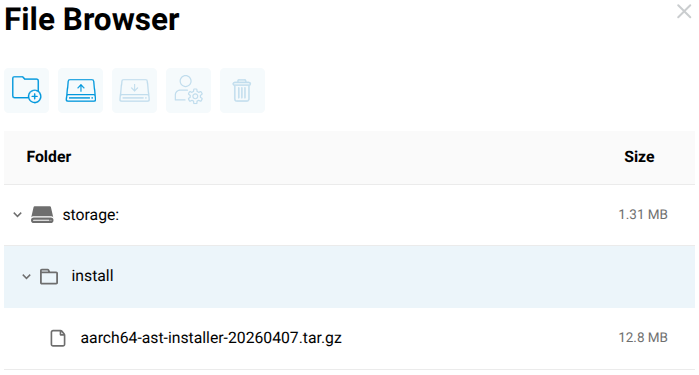
2. Depending on the architecture of the router, download the Asterisk installer file mipsel-ast-installer.tar.gz, aarch64-ast-installer.tar.gz or mips-ast-installer.tar.gz into the install folder;
Note
Asterisk installer for MIPSel: mipsel-ast-installer-20240528.tar.gz
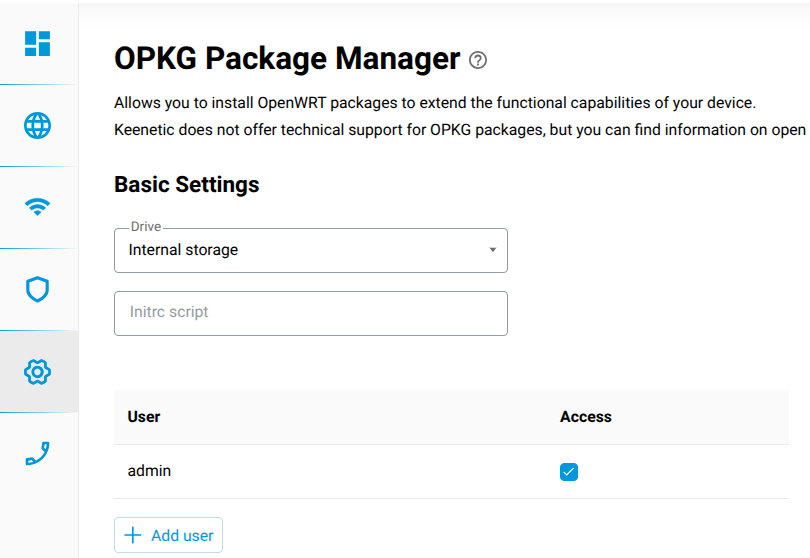
3. On the web interface page Management > OPKG, under the Basic Settings section, select the Internal storage drive. Click the Save button to apply the settings and start the Asterisk installation.
The installation and configuration of Asterisk may take around four minutes. You can monitor the progress in the router’s system log. To do this, go to the web interface page Management > Diagnostics and click Show log.
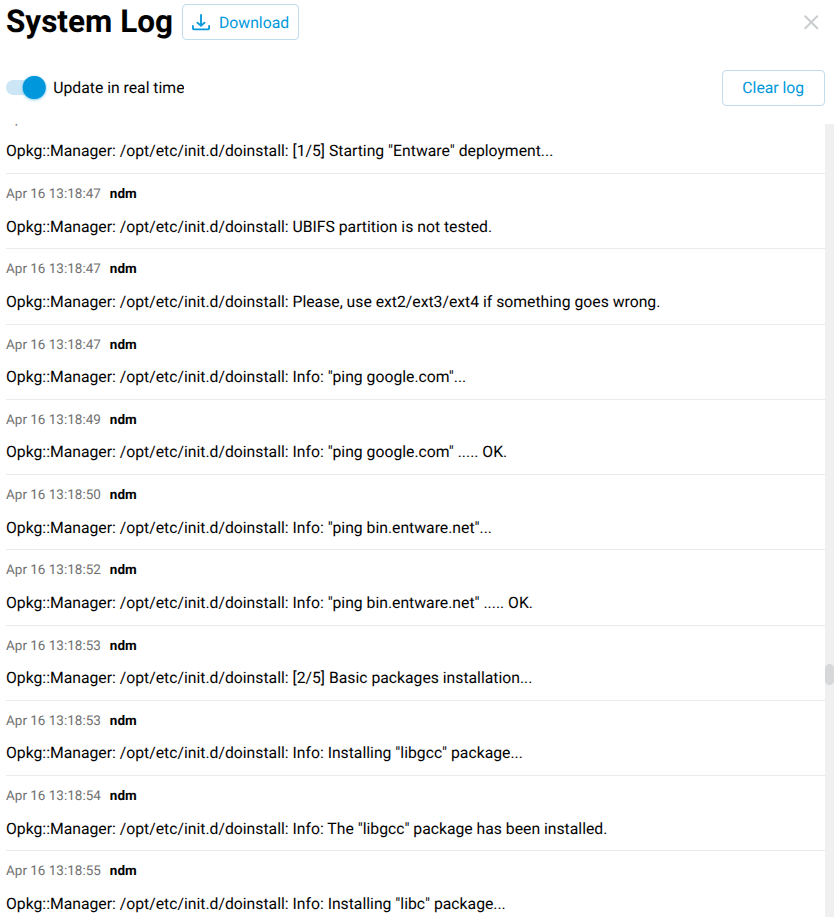
The message Asterisk installed! in the system log indicates that the Asterisk installation has been completed.
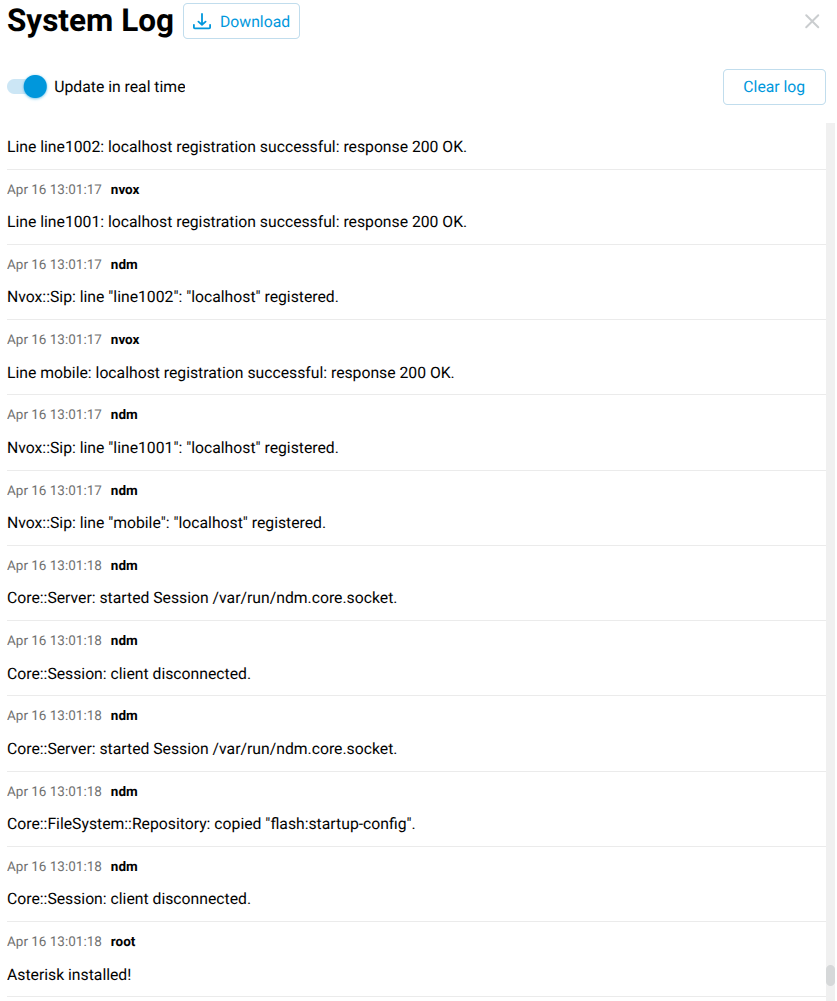
Once the installation is complete, the following settings will be configured automatically:
A
mobiletelephone line has been created to connect the built-in Phone Station PBX to Asterisk;All DECT handsets or telephone ports on the Keenetic Phone Station will be linked to the
mobileline for VoLTE calls;Asterisk will be configured to route VoLTE calls via the
mobileline;Asterisk SIP trunks will be created to connect to IP telephony providers in accordance with the configuration of the dedicated telephone lines on the Keenetic Phone Station;
Tip
The installer will disable the telephone lines whose configuration was used to create the SIP trunks.
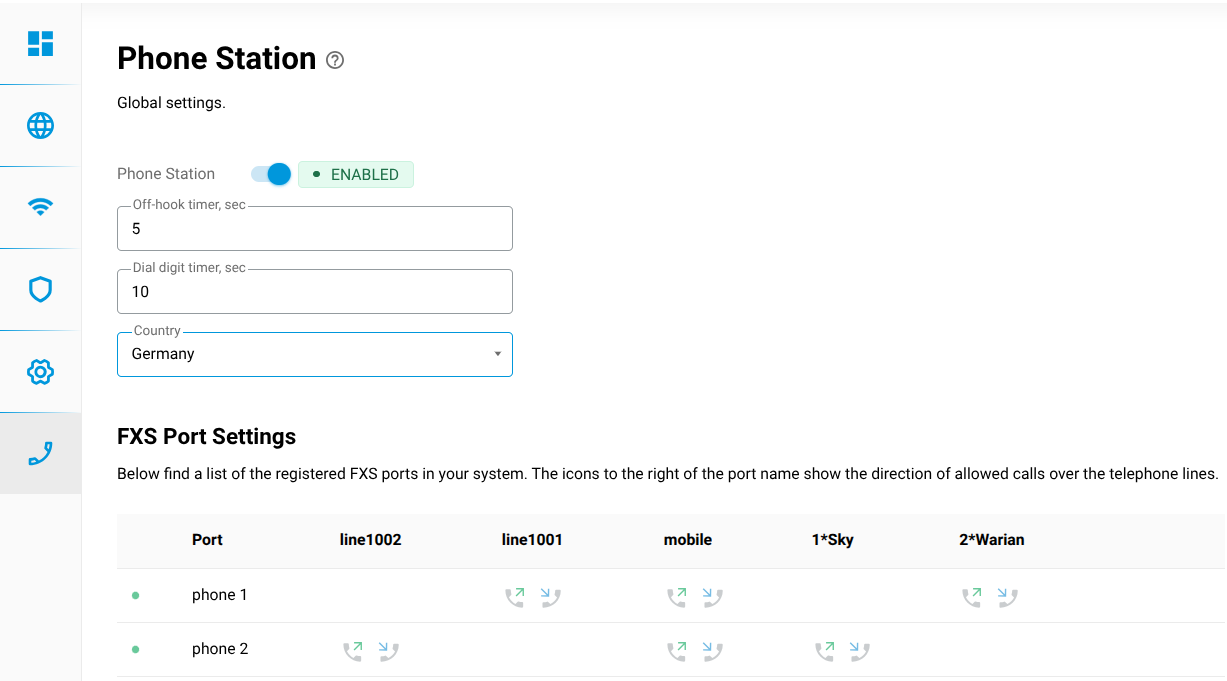
A separate telephone line will be created for each Keenetic DECT handset or telephone on the Phone Station, with dialling rules for calls via Asterisk SIP trunks, internal calls, voicemail, test calls and conferences. See the rest of this article for more details on voicemail, test calls and conferences.
The screenshots below show an example of automatic configuration for the Phone Station and Asterisk.
Keenetic Phone Station:
Asterisk:
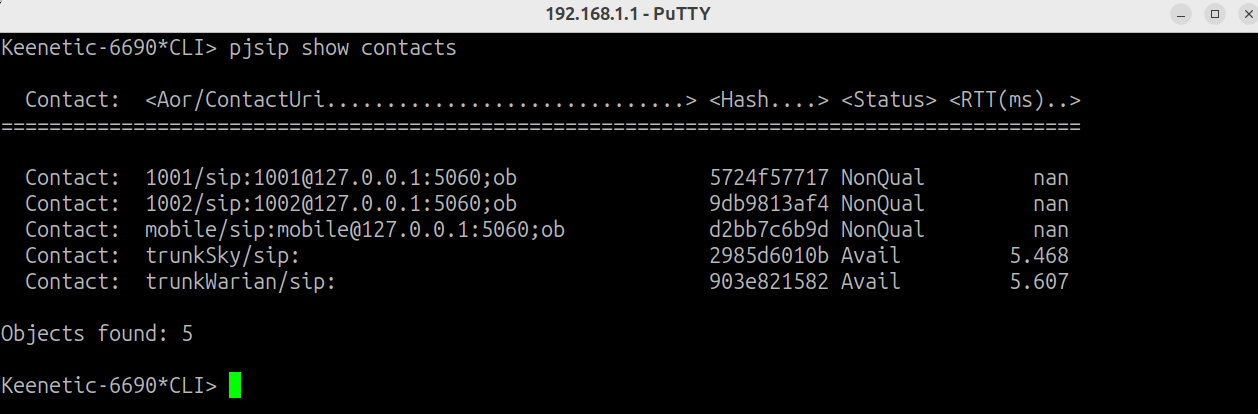
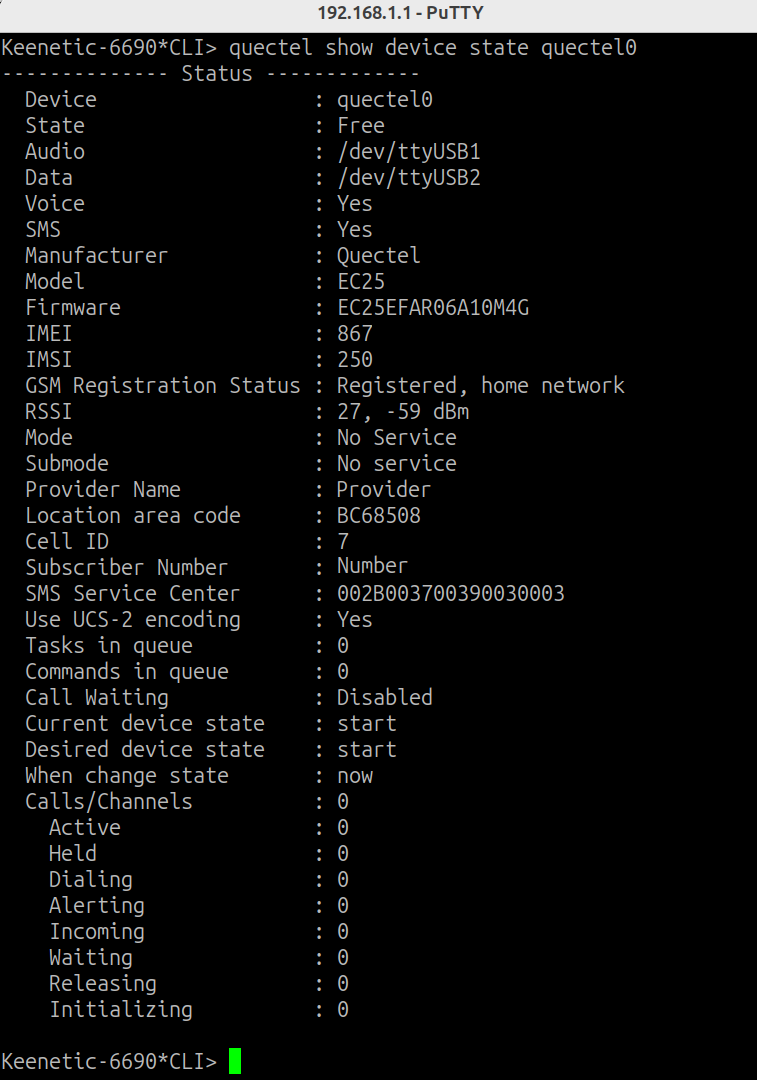
You can check the current status of Asterisk using the commands pjsip show contacts and quectel show device state quectel0. These commands are executed in the Asterisk console. For instructions on how to connect to the Asterisk console, see later in this article.
Connecting IP phones
Extensions 1000–1009 and 2000–2009 configured in Asterisk are intended for connecting IP phones. When configuring an extension on an IP phone, use the following settings:
SIP registrar/proxy/domain: router IP address;
SIP User ID: one of the numbers 1000–1009 or 2000–2009;
SIP Authentication ID: user1000–user1009 or user2000–user2009;
Password: ast18-opkg-mipsel;
Audio codecs: G.711a, G.711u.
Tip
During automatic configuration, internal numbers in the range 1000–1006 are used to connect DECT handsets or telephones connected to the Phone Station. Do not use these numbers to connect IP phones.
The password specified above is automatically configured for all internal numbers. It should be changed in the configuration file /opt/etc/asterisk/pjsip.conf.
VoLTE calls
To make an outgoing VoLTE call, dial the recipient’s number on a DECT handset or a telephone connected to the telephone adapter, then press the call button. When dialling, follow the dialling rules set by your mobile network operator.
When receiving a VoLTE call on the SIM card installed in the USB modem, all DECT handsets or telephones will ring, and their displays will show the caller’s number and the line name mobile.
Tip
On DECT handsets that do not support CAT-iq 2.0, only the caller’s number is displayed; the line name is not shown.
Calls via SIP trunks
To make an outgoing call via an automatically configured SIP trunk, dial the subscriber’s number with the appropriate prefix. In the example above, to call 1234567 via Sky, you need to dial 1*1234567. When dialling a number, follow the dialling rules applicable to your IP telephony provider.
For an incoming call via a SIP trunk, the caller will hear a prompt to dial an extension number. They can then dial one of the extension numbers 1000–1009, 2000–2009 and call another IP phone linked to that number. In the example above, phone 2 connected to the Keenetic Linear adapter is linked to the line line1002. To call this phone, you need to dial 1002.
Test calls
To test the interaction between DECT handsets/phones, the Keenetic Phone Station and Asterisk, the following functions have been configured in this setup:
Echo test. Call 800, listen to the prompt, record your message, press
#, and then listen to the message you recorded to check the audio exchange between Asterisk and your IP phone;Callback. Allows you to test incoming calls from Asterisk and the Caller ID display. Dial 802, listen to the message, wait for the connection to end, and hang up. An incoming call will be received in 10 seconds. The IP phone display shows the name
CallBackand the number1234567890. Music plays after answering the call;Extension 9999. When you call this number, music plays.
Call transfer
During a call, dial ## (Blind Transfer) or ** (Attended Transfer), then dial the number of the person to whom you wish to transfer the call.
Conferences for three or more participants
To join a conference, dial 001. Every participant who joins the conference can speak to all the other participants in the conference. When a participant joins or leaves the conference, all other participants in the conference hear the relevant notifications. The first user to join the conference receives a special notification and music until other participants join.
Additional features
After installing Entware, the following features can be automatically configured and enabled using a special script:
voicemail;
call recording;
TLS transport.
Conversations are recorded for external and internal calls, as well as during conferences. Audio recordings of conversations in the format PCM 8000Hz mono 128kbps are saved on a USB drive in the folder /asterisk/records.
Audio recording file names have the following format:
<caller>-<callee>_<YYMMDD>-<HHMM>.wav
where:
caller — the caller’s number;
callee — the recipient’s number;
YYMMDD — the year, month and day the call took place;
HHMM — the time (hours, minutes) the call took place.
When configuring call recording, you can enable automatic conversion of audio recordings to MP3. This will reduce the size of the audio recordings by approximately 16 times.
Voicemail works as follows: if an internal number does not answer an incoming call within one minute, the caller hears a prompt to leave a message for that user. Messages can be accessed via the number 9000. To log in, you must enter the relevant extension number 100x as both the subscriber number and the password. Voicemail passwords can be changed in the configuration file \opt\etc\asterisk\voicemail.conf.
Recorded messages are stored on a USB drive in the folder /asterisk/voicemail/.
TLS SIP transport enables SIP server authentication with certificates and the encryption of SIP messages. It guarantees a connection to a genuine SIP server and prevents malicious parties from intercepting information about external calls.
For configuring the additional features described above, run the command configure-features in the Linux console to launch the script. Then follow the on-screen instructions. For information on how to connect to the Linux console, see the end of this article.
Backing up and restoring Asterisk
You can back up your current Asterisk installation to a file on a USB drive so you can quickly restore it if necessary. To do this, run the backup command in the Linux console and follow the on-screen instructions. For information on how to connect to the Linux console, see the end of this article.
To restore a previously backed-up Asterisk installation from a file:
1. Connect a USB drive with an ext4 partition to the router;
2. Create a folder named /install in the ext4 partition on the USB drive and copy the file containing your Asterisk installation into this folder;
3. Copy the same file to the root directory of the ext4 partition on the USB drive;
4. On the web interface page Management > OPKG, under the Basic Settings section, select the ext4 partition on the USB drive and click the Save button to apply the settings and start the Asterisk installation;
5. Once the installation is complete, your Asterisk installation is running on the USB drive. To deploy it to the router’s internal storage, run the restore command in the Linux console to launch the script. Then follow the on-screen instructions. See below for details on how to connect to the Linux console;
6. Once the script has finished running, on the web interface page Management > OPKG, in the Basic Settings section, select Internal Storage and click the Save button to apply the settings and run your Asterisk installation on the internal storage.
Linux console
To connect to the Linux console, log in to the router via SSH. To do this, use the free SSH client PuTTY. When configuring the connection, use the following details:
IP address:
192.168.1.1(default in theHomesegment);connection type: SSH;
port:
22. If the SSH Server and/or SFTP Server component is installed on your router, specify port222.
On your first connection, confirm that the security key has been added to the PuTTY cache to continue establishing the connection. For authentication, use the username: root and password: keenetic.
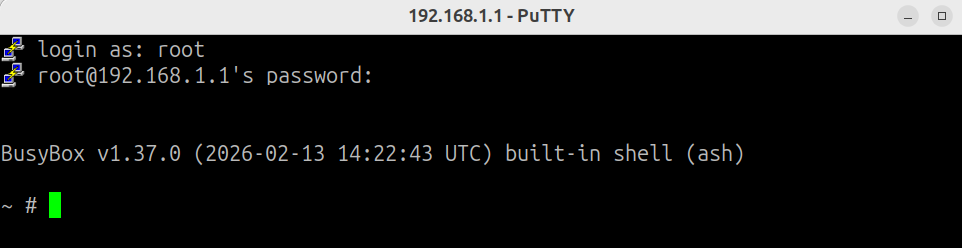
After successfully logging in, we recommend changing the password using the passwd command.
Asterisk console
To connect to the Asterisk console, use the command asterisk -rvvvv in the Linux console.
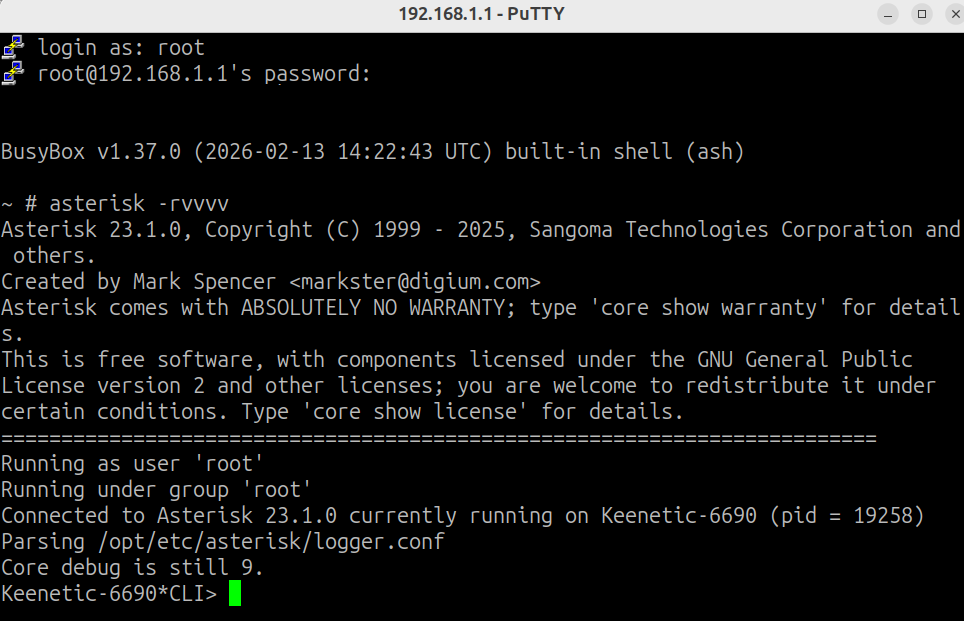
Below are some useful Asterisk console commands:
dialplan reload — reload extensions.conf;
pjsip show registrations — list registered SIP peers;
pjsip show contacts — display the list of contacts;
pjsip show transports — display a list of SIP transports;
core show translation — display the transcoding table. Shows the codecs installed on the system and the time required to transcode one second of audio data from one codec to another;
pjsip show channels — information about all active SIP connections;
quectel show device state quectel0 — display the current status of the 4G USB modem;
exit — return to the Linux console.
If necessary, you can modify the Asterisk configuration, install additional modules, and set up new features. A list of all available Asterisk modules and other packages available for download and installation can be found at this link: https://bin.entware.net/aarch64-k3.10/ (AArch64)
The opkg command is used to install new modules.
Example of using the command to install the H.264 video codec: opkg install asterisk-format-h264
Detailed information on configuring Asterisk can be found in the book 'Asterisk: The Definitive Guide, 5th Edition' and in numerous online articles.
Information on the Entware project: https://forum.keenetic.com/forum/53-open-packages/